Performing a batch simulation of scenarios
Run a batch simulation of multiple scenarios.
Tutorial resources
These downloadable resources will be used to complete this tutorial:
Step-by-step:
Once you have set up multiple scenarios with various settings and conditions, you can perform a batch simulation of all scenarios to later compare the outputs between them. The outputs can be displayed as graphs or tables, or you can use the Scenario Comparison tool.
- Open the appropriate .aprx file in ArcGIS Pro.
- From the ribbon, InfoWater Pro tab, Project panel, click Initialize.
- In the Model Explorer, expand the Scenario drop-down and select BASE, Base Data Scenario.

- Click the Command Center tab.
- Expand the Tools folder.
- Double-click Batch Simulation.

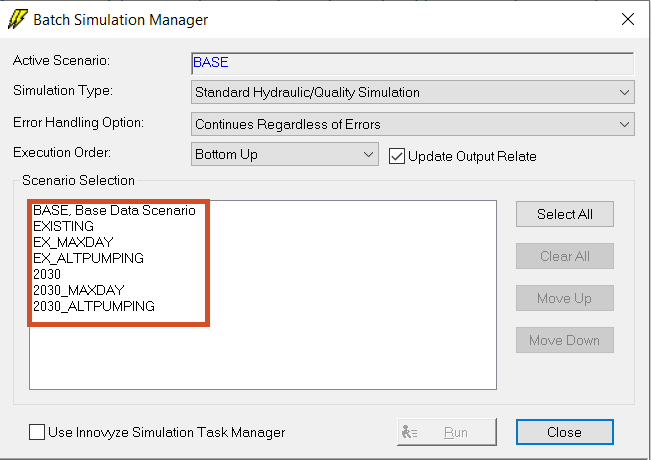
- In the Batch Simulation Manager:
- Ensure that the Active Scenario is set to BASE.
- Set the Simulation Type to Standard Hydraulic/Quality Simulation.
- Set the Error Handling Option to Continues Regardless of Errors.
- Expand the Execution Order drop-down and set it to Bottom Up.
- In the Scenario Selection pane, rearrange the scenarios by selecting each and then clicking Move Up or Move Down, as needed, to arrange them in this order:
BASE, Base Data Scenario
EXISTING
EX_MAXDAY
EX_ALTPUMPING
2030
2030_MAXDAY
2030_ALTPUMPING

- Press CTRL and click all the scenarios except for BASE, Base Data Scenario to select and highlight them.
- Click Run.
TIP: Watch the Message Board to see if any scenario runs fail.
- Once the scenarios have completed running, click Close to exit the Batch Simulation Manager.
Since the execution order was bottom up, the EXISTING scenario will be the active scenario when the process is finished.